If your backyard trampoline has gone from family favorite to eyesore, it’s time to think about trampoline removal. Whether it’s rusting, rarely used, or taking up valuable yard space you’d rather use for a garden, patio, or play set, removing a trampoline safely and efficiently is completely doable with the right plan.
Below is a step‑by‑step guide to help you decide whether to DIY, recycle, or hire pros, plus tips to keep the process safe, affordable, and environmentally responsible.
When Is It Time to Remove a Trampoline?
Before you jump into trampoline removal, confirm it really is time to say goodbye. Common signs include:
- Visible wear and tear: Torn mat, fraying safety net, or cracked padding.
- Rust and corrosion: Rusted springs or frame that squeaks and bends.
- Safety concerns: Wobbling legs, loose bolts, or missing parts.
- Lifestyle changes: Kids have outgrown it, or you’d rather use the space differently.
- HOA or visibility issues: Neighborhood rules or you just want a cleaner yard view.
If you’re seeing more than one of these, removing the trampoline often makes more sense than repairing it.
Plan Your Trampoline Removal: Safety First
Trampolines are under tension and contain metal parts that can pinch, snap, or fall. Proper planning keeps you safe:
-
Check the weather
Disassemble on a dry, calm day. Wet surfaces and wind increase risk. -
Gather safety gear
- Work gloves
- Safety glasses
- Closed‑toe shoes
Optional but helpful: long sleeves and a cordless drill.
-
Clear the surrounding area
Move toys, furniture, or landscaping features away from the work zone. -
Decide your disposal method
Are you going to:- Reuse or repurpose parts?
- Recycle the metal?
- Put it out for bulk trash?
- Hire a junk removal service?
Having this plan up front helps you disassemble and sort materials correctly.
Tools You’ll Need for DIY Trampoline Disassembly
Most backyard trampolines come apart with basic tools:
- Socket set or adjustable wrench
- Screwdriver (Phillips and flathead)
- Spring puller tool (often comes with trampoline, or use pliers carefully)
- Utility knife (for cutting net/pads if they’re trash)
- Rubber mallet (optional, for stuck connections)
- Moving blankets or tarp (to pile parts neatly)
Having the right tools makes trampoline removal faster and reduces frustration with stubborn bolts or tight springs.
Step‑by‑Step: How to Disassemble a Trampoline Safely
Follow this order to minimize stress on the frame and springs and to stay safe during the process.
1. Remove Accessories and Safety Features
Start by stripping off anything not structurally critical:
-
Take off the safety net
Undo clamps, ties, or screws holding the net poles. Remove poles from their sockets and set them aside. Then slide or cut the net off if it’s damaged and not worth saving. -
Remove the enclosure pads
These are the padded covers over the springs. Detach Velcro, bungee cords, or tie‑downs, and pull the pads free from around the trampoline.
At this point, you should see the bare jumping mat and springs.
2. Release Tension by Removing Springs
This is a critical part of trampoline removal because the springs are under tension.
-
Start opposite sides
Remove springs in a star pattern—one on one side, then the opposite side—so tension is released evenly. -
Use a spring puller tool
Hook the tool into the spring, pull it away from the frame, and unhook it from the mat.
If you don’t have a tool, use pliers and a strong grip, and work slowly. -
Work your way around
Continue removing springs, alternating sides. As tension decreases, the job gets easier. -
Remove the jumping mat
Once all springs are out, roll or fold the mat. If it’s in good condition, consider donating or repurposing it.
3. Disassemble the Frame
With the mat and springs gone, the frame is lighter and easier to handle.
-
Start with the legs
Flip sections if needed to access bolts and joints. Remove leg pieces first so the frame ring can be separated. -
Separate the top rail
Slide or unbolt the top frame sections from one another. Use a rubber mallet if pieces are stuck from rust. -
Organize parts
Stack similar parts together: legs, top rails, springs, poles. This makes transport, recycling, or resale much simpler.
Eco‑Friendly Ways to Dispose of a Trampoline
Trampoline removal doesn’t have to mean everything goes to the landfill. Many materials can be reused or recycled.
1. Metal Frame and Springs
The frame and springs are usually steel and often recyclable.
-
Scrap metal yards
Many facilities accept steel and may even pay a small amount by weight. Check local yards and their rules. -
Municipal recycling
Some cities allow large metal items at recycling centers or on designated bulk pickup days (source: U.S. EPA – Reduce, Reuse, Recycle).
2. Jumping Mat and Safety Pads
These are typically made from polypropylene, PVC, and foam.
Options include:
-
Upcycling and repurposing
- Ground cover for gardening
- DIY outdoor shade or privacy screens
- Drop cloths for painting or messy projects
- Pet beds, kennel liners, or outdoor mats
-
Trash disposal
If they’re brittle, moldy, or torn beyond use, bag and dispose of them according to local rules.
3. Safety Net and Enclosure Poles
- Poles: Metal poles can go with other metal for scrap or recycling.
- Net: If in good condition, consider donating or offering free online; otherwise, dispose of it with household trash.
Repurposing a Trampoline Frame: Creative Ideas
If you’re handy or enjoy DIY, trampoline removal can give you raw materials for new projects:
-
Garden trellis or greenhouse frame
Use the circular frame as an arch for vines or as a hoop‑house structure for a greenhouse. -
Hammock stand or swing frame
A modified frame can support hammocks, porch swings, or hanging chairs. -
Outdoor shade structure
The metal ring and poles can become the skeleton for a sun sail or pergola‑style shade. -
Chicken run or pet enclosure
With added wire mesh, a frame can become a safe outdoor enclosure for animals.
The key is to save only the pieces you realistically plan to use soon; otherwise, you’re just trading one yard clutter for another.
Should You DIY or Hire Professional Trampoline Removal?
Not everyone wants to wrestle with rusted bolts and heavy metal tubing. Here’s how to decide:
DIY Trampoline Removal Makes Sense If:
- You’re comfortable with basic tools.
- The trampoline isn’t severely rusted or damaged.
- You have a vehicle (or a friend with one) to haul materials.
- You don’t mind spending a few hours on the project.
Hiring Pros Is Better If:
- The frame is extremely rusted and unstable.
- You have back, mobility, or health issues.
- You lack tools or a vehicle for transport.
- You want a fast, done‑for‑you solution.
What professional services typically include:
- Full disassembly
- Load‑up and hauling
- Disposal or recycling of materials
- Optional yard clean‑up around the area
Costs vary by location and size, but many junk removal companies offer same‑day or next‑day service and upfront estimates.
How to Prepare for Professional Trampoline Pickup
If you decide not to handle trampoline removal yourself, a bit of prep can reduce cost and hassle:
-
Clear access
Make sure there’s a path from the street or driveway to the trampoline, free of obstacles. -
Remove smaller accessories
Take off any toys, covers, or items under or around the trampoline. -
Ask about fees
Confirm:- Whether pricing is flat or by volume/weight
- What’s included (disassembly, hauling, sweeping)
- Any extra charges for difficult access or stairs
-
Request recycling when possible
Some companies will separate metal and other materials for recycling if you ask.
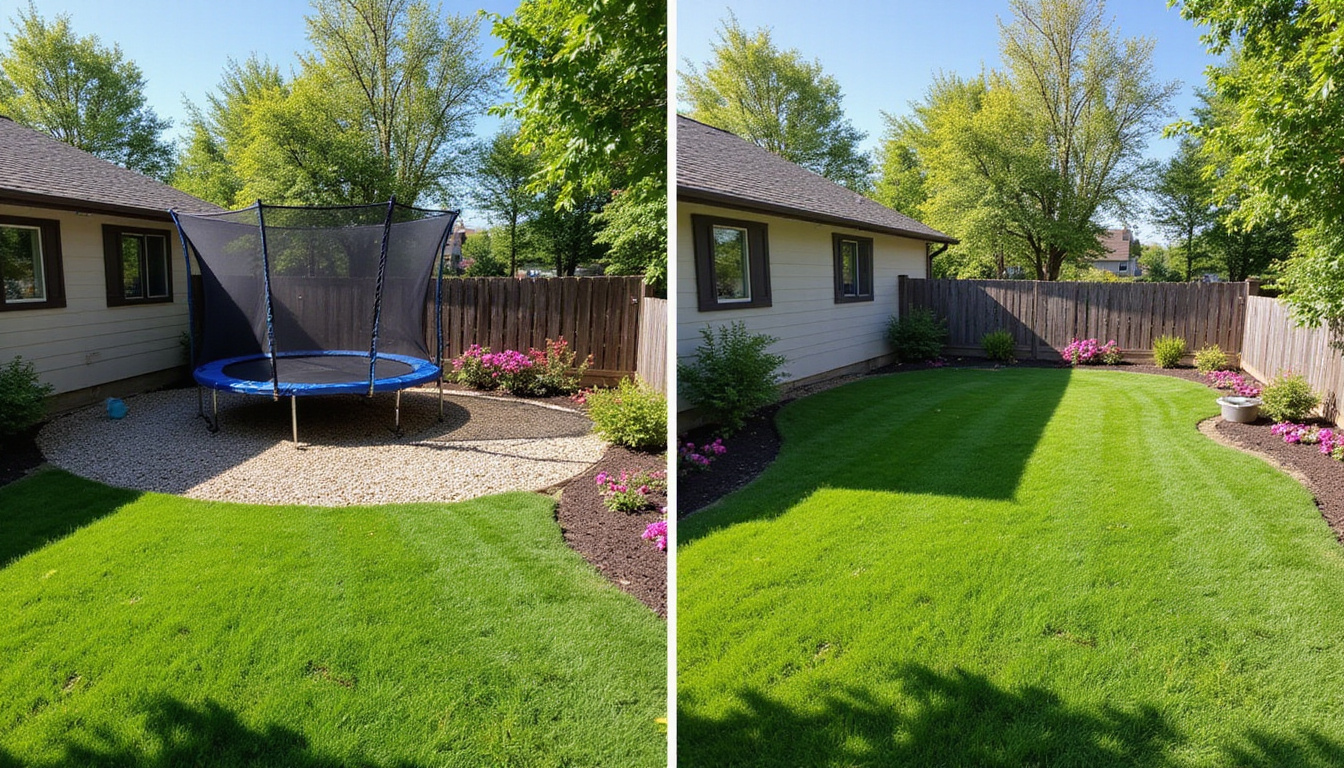
Reclaiming Your Yard Space After Trampoline Removal
Once the trampoline is gone, you may be left with bare ground, dead grass, or uneven soil. Take these steps to refresh the area:
1. Level and Repair the Ground
- Fill low spots with topsoil.
- Rake smooth and tamp down the soil.
- Remove any leftover anchors or stakes.
2. Improve the Soil (If Planting)
Trampolines can compact soil over time. Loosen the top few inches and mix in compost if you plan a garden or flower bed.
3. Seed, Sod, or Cover
Depending on your plans:
- For lawn: Apply grass seed or lay sod. Keep watered until established.
- For a patio: Lay pavers, gravel, or decking over a leveled base.
- For play areas: Install mulch, rubber tiles, or artificial turf.
4. Reimagine the Space
Popular ideas for ex‑trampoline zones:
- Fire pit or seating area
- Raised garden beds or herb garden
- Kids’ playhouse or sandbox
- Outdoor dining area or grill station
The key advantage of trampoline removal is flexibility—you get to redesign the space for your current lifestyle.
Cost Factors in Trampoline Removal
If you’re budgeting for this project, consider these cost drivers:
- DIY vs. professional: DIY is mostly time and effort; pros add labor, hauling, and disposal fees.
- Trampoline size and type: Larger or in‑ground models are harder and more expensive to remove.
- Condition and access: Rust, tight spaces, hills, and fences increase difficulty.
- Local disposal fees: Some areas charge for bulky items or certain materials.
To keep costs down:
- Disassemble as much as you can yourself.
- Pre‑sort metal for recycling.
- Get multiple quotes from junk removal or hauling services.
- Use city bulk pickup if available.
Quick Checklist for Easy Trampoline Removal
Use this to keep the process simple and safe:
- Decide: DIY or hire pros.
- Gather tools and safety gear.
- Clear work area and plan disposal.
- Remove net, pads, and accessories.
- Release springs evenly and remove mat.
- Take frame apart and sort parts.
- Recycle metal if possible; dispose of fabric and foam.
- Repair and refresh the ground.
- Redesign the space for your new yard goals.
FAQ About Trampoline Removal and Disposal
1. How much does it cost to have a trampoline removed?
Professional trampoline removal typically ranges from $100 to $350 depending on size, condition, and access. DIY costs are mostly your time plus any disposal or recycling fees your local facility charges.
2. Can I put my old trampoline out for bulk trash pickup?
Many municipalities accept trampolines on designated bulk pickup days, but they often require disassembly first. Check your local waste management guidelines for rules on metal frames, springs, and large fabric pieces.
3. Is trampoline disposal environmentally friendly if I recycle the metal?
Yes. The frame and springs are usually steel, which is highly recyclable. Taking metal to a scrap yard or recycling center significantly reduces landfill waste. The mat, pads, and net are harder to recycle, but you can often upcycle or repurpose them for home and garden projects.
Reclaiming your backyard from an old trampoline doesn’t have to be overwhelming. With a clear plan, basic tools, and thoughtful disposal, you can complete trampoline removal in an afternoon and open up that space for something you’ll actually use and enjoy.
If you’re ready to take back your yard but don’t want the hassle, consider booking a local removal or junk hauling service to handle everything from disassembly to recycling. Whether you DIY or hire help, start today—and by this weekend, you could be relaxing, entertaining, or gardening where that unused trampoline used to stand.
Junk Guys Inland Empire
Phone: 909-253-0968
Website: www.junkguysie.com
Email: junkguysie@gmail.com